

Cross-chain bridges sound magical until you actually try to use one and suddenly worry: “Wait, what if my tokens just vanish into the void?”
Let’s unpack how they really work, where the risks hide, and when it actually makes sense to use them.
—
1. A Short History: From Isolated Chains to Interconnected Networks
Early blockchains were walled gardens. Bitcoin did its thing. Ethereum did its thing. If you wanted to move value, you basically had to sell on an exchange and rebuy on another chain. Slow, expensive, and very centralized.
Then DeFi summer 2020 hit. Yield farms on Ethereum exploded, gas fees went crazy, and suddenly everyone cared about alternative L1s and L2 rollups. Liquidity scattered across Ethereum, BSC, Polygon, later Arbitrum, Optimism, Avalanche, Solana, and more.
At first, every ecosystem hacked together its own bridge. The Polygon PoS bridge, the Binance Bridge, Avalanche Bridge, etc. Each had its own UX, different trust assumptions, and opaque security models.
Only later did we see more generalized, “top cross-chain bridge platforms for DeFi” like Hop Protocol, Across, Stargate, Wormhole, LayerZero-based bridges and others. They tried to solve the same core problem: move value and messages across chains without relying on centralized exchanges—while not introducing catastrophic security holes.
The results? Mixed.
Some bridges have been extremely robust; others have been the source of some of the largest exploits in crypto history. That’s why understanding how cross-chain bridges actually work is not optional anymore—it’s risk management.
—
2. Core Models: How Cross-Chain Bridges Actually Work Under the Hood
When you strip away the jargon, almost every bridge falls into one of three categories:
1. Lock & Mint (or Burn & Release)
2. Liquidity Networks (Pool-Based Bridges)
3. Light-Client / Native Verification Bridges
Let’s break them down in normal language.
—
2.1 Lock & Mint: The Classic Approach
This is the most intuitive model.
– You send tokens on Chain A to a bridge contract.
– The contract locks them.
– The bridge system then mints a wrapped version of those tokens on Chain B.
When you want to go back:
– You burn the wrapped tokens on Chain B.
– The contract on Chain A releases the original tokens back to you.
A typical example: the old Ethereum-to-BSC bridges for wrapped assets like WETH or BTCB.
Trust assumption:
You must trust that the bridge’s validators, multi-signature, or oracles will not collude, be hacked, or go offline. If their keys are compromised, an attacker can mint fake tokens on one chain or drain the locked assets on the other.
That’s why many users today search for the safest way to bridge tokens between chains rather than just the “fastest” one.
—
2.2 Liquidity Networks: LPs Are the Bridge
This model doesn’t literally move your exact tokens across chains. Instead, it matches your deposit with existing liquidity.
– You send USDC on Chain A to the bridge.
– A liquidity provider (LP) or pool on Chain B sends you USDC there from its existing balance.
– Behind the scenes, accounting is updated and LPs are compensated with fees.
So your tokens never “travel” across chains; you just swap balances with an LP network. This is how bridges like Hop, Across, and Stargate broadly operate (each with nuances).
Pros:
– Fast.
– Often cheaper, especially on L2s.
– Less dependent on a single multisig contract holding all the value.
Cons:
– Requires deep liquidity on both sides.
– More complex cross-chain bridge comparison fees and security decisions: you pay LPs, relayers, and gas.
—
2.3 Light-Client / Native Verification: The Purist’s Dream
This is the most “crypto-native” approach: one chain actually verifies the state of another chain via a light client.
– Chain B runs a light client of Chain A.
– It can verify proofs that “X transaction really happened on Chain A.”
– No trusted multisigs, no external oracles—security is inherited directly from the underlying chains.
Examples include:
– IBC in the Cosmos ecosystem.
– Some ETH ↔ rollup designs moving toward native verification.
This is closer to the ideal of “trustless bridging,” but it’s also technically complex and can be slower or more expensive, especially when dealing with chains that were not designed for easy light-client verification.
—
3. How to Transfer Crypto Between Blockchains: The Actual Flow
Let’s look at what happens when you click that “Bridge” button in your wallet or on a dApp.
1. You choose source chain, target chain, token, and amount.
Example: Ethereum → Arbitrum, 1,000 USDC.
2. The UI estimates fees and time.
Good bridges show gas on both chains, bridge fees, and maybe a slippage buffer. This is where a mental cross-chain bridge comparison fees and security check should happen.
3. You sign and send a transaction on the source chain.
– For lock & mint: you send tokens into a bridge contract.
– For liquidity bridges: you send tokens to a pool or router contract.
4. Off-chain or on-chain logic confirms the transaction.
– Oracles/relayers/validators observe your tx on Chain A.
– They post a message or proof to Chain B.
5. You receive tokens on the target chain.
– Lock & mint: you get wrapped tokens.
– Liquidity network: you get “real” native tokens from a pool.
– Native verification: a proof is validated by a light client, then tokens are released or minted.
Sometimes this is near-instant (L2-to-L2 via liquidity bridges).
Sometimes it takes minutes to hours (L1 → L2 finality, or exiting from certain rollups using native bridges).
—
4. Real-World Cases: When Bridges Worked… and When They Didn’t
4.1 Case: A Yield Farmer Optimizing Across Chains
Imagine Alice, an active DeFi user:
– She holds USDC on Ethereum mainnet.
– She sees a juicy lending rate on Arbitrum, plus lower gas fees.
– Her question: how to transfer crypto between blockchains safely and cost-effectively.
She checks a few options:
– Native Ethereum → Arbitrum bridge: very secure, but can be slower and sometimes clunky.
– A popular third-party bridge using liquidity pools: faster and offers better gas optimization.
Alice uses a wallet that aggregates the best cross-chain bridges for crypto based on her parameters. It suggests a well-audited liquidity bridge with strong TVL, distributed validator set, and transparent docs.
She bridges 5,000 USDC:
– Pays a small bridge fee + Ethereum gas.
– Gets USDC on Arbitrum in a couple of minutes.
– Supplies to a lending protocol, earns yield.
A month later, she wants to move back to Ethereum. This time she realizes:
– Exiting via the native rollup bridge would be safer but slower (because of the fraud-proof window).
– The same liquidity bridge offers nearly instant exit with a modest fee.
Alice splits the difference:
– Half via the native bridge for long-term funds.
– Half via the fast liquidity bridge for flexibility.
That’s a rational use of two different security models, not blind trust of whatever is fastest.
—
4.2 Case: The “Too Good to Be True” New Bridge
Now Bob sees a new bridge on Twitter:
– Zero fees.
– “Instant” transfers.
– Very high APY if you deposit liquidity.
He ignores some red flags:
– Brand-new protocol.
– No reputable audits.
– Validator set controlled by a single team with opaque multisig.
– Documentation is shallow.
Bob moves a big chunk of his stablecoins using this bridge.
A month later, the multisig or validator keys are compromised. The attacker:
– Mints fake tokens on one side of the bridge.
– Drains the real locked tokens on the other side.
Result: the wrapped assets Bob holds are now backed by nothing. Even if the team patches the exploit, the financial hole is real. Bob’s “bridge tokens” are permanently undercollateralized.
This is why fees should never be the only thing you look at. Fast and cheap is meaningless if the trust assumptions are extreme.
—
5. When You Should Actually Use a Cross-Chain Bridge

You don’t need a bridge for every move. Sometimes the old-school “sell and rebuy on a centralized exchange” is actually safer and simpler—especially for large sums and major assets.
Use a cross-chain bridge when:
1. You need to access DeFi on a chain that your centralized exchange doesn’t support directly.
2. You want to move between L2s quickly without touching fiat or CEXs.
3. You’re dealing with niche tokens that aren’t listed on big exchanges but have liquidity on multiple chains.
4. You care about maintaining on-chain privacy/sovereignty instead of sending everything through a KYC’d exchange.
Avoid or think twice when:
– The bridge is obscure, unaudited, or controlled by a tiny group.
– TVL is low and volume is thin (harder to trust and exit).
– The token is already very liquid on your target chain; in that case, trading on a CEX or DEX might be more straightforward.
—
6. How to Choose: A Practical Checklist
Here’s a simple decision process you can walk through.
- Clarify your goal. Are you chasing yield, paying someone, or just repositioning your portfolio? If time is not critical, you can favor more conservative, native bridges.
- Check the asset and chain pair. For blue-chip assets (ETH, USDC, USDT) between well-known ecosystems, the “top cross-chain bridge platforms for DeFi” are usually enough—look for those with established track records.
- Evaluate security assumptions. Multisig? Oracle-based? Native light client? How many signers? Are they public entities or anonymous wallets? This matters more than UI polish.
- Compare total cost. Don’t only ask which is cheapest, but which is the best trade-off between cost, time, and risk. This is the real meaning of a “cross-chain bridge comparison fees and security” exercise.
- Test with a small amount first. Always. Treat the first transfer as a paid rehearsal.
Do this consistently and you will eliminate most catastrophic mistakes.
—
7. Frequent Misconceptions About Cross-Chain Bridges
7.1 “If It’s Decentralized, It Must Be Safe”
Decentralization is not binary.
Many bridges brand themselves as decentralized but:
– Use a 3-of-5 or 4-of-7 multisig fully controlled by the core team.
– Depend on a single oracle provider.
– Rely on governance keys that can change parameters instantly.
This isn’t necessarily bad—but it’s not trustless. Treat it as a custodial setup with on-chain bookkeeping.
—
7.2 “Native Bridge = Always Better”
Native bridges (like official L1 ↔ L2 bridges) are often the safest way to bridge tokens between chains in a strict security sense, especially for large sums.
But they’re not strictly superior in every dimension:
– They can be slow (fraud-proof windows, finality delays).
– They may support fewer assets.
– UX can be worse, with manual claim steps and weird gas patterns.
For day-to-day use or small amounts, well-designed liquidity bridges may offer a better practical experience without a huge added risk, assuming they’re battle-tested and well-audited.
—
7.3 “Bridged Tokens Are the Same as Native Tokens”
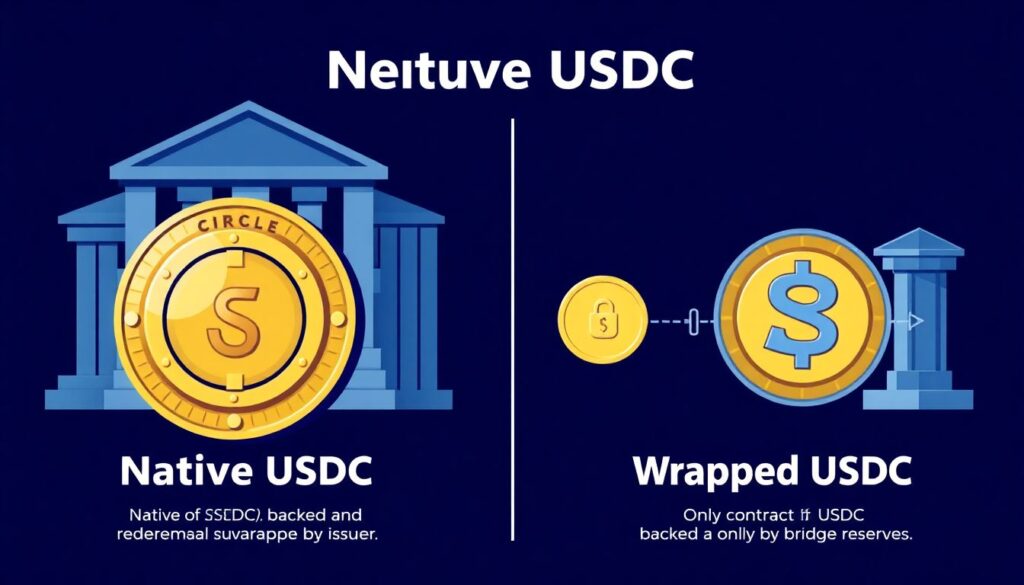
They’re not. A bridged USDC from one protocol is not automatically equivalent to native USDC minted by Circle on that chain:
– Native USDC has backing and redemption guarantees from the issuer.
– A wrapped USDC (like “USDC.e” or some custom symbol) may be backed only by a bridge contract’s reserves.
A protocol might accept only native tokens as collateral, precisely to avoid bridge risk.
Always check: is this token native, canonical, or a wrapped representation from a specific bridge?
—
7.4 “More Bridges = More Liquidity = Always Good”
Too many bridges for the same asset can fragment liquidity, confuse users, and create UX landmines:
– Multiple versions of the same token on a target chain.
– Incompatible collateral in lending markets.
– Liquidity split across many pools, reducing depth.
Sometimes the healthiest situation is a small set of clearly dominant, high-quality bridges plus official native routes.
—
8. So, How Should You Actually Use Bridges in Practice?
If you want a simple mental model:
– For large, long-term moves of blue-chip assets:
– Prefer native or officially endorsed bridges where possible.
– Or use top exchanges as an intermediate hop, withdrawing directly to the target chain.
– For active DeFi strategies and frequent smaller transfers:
– Use a small set of the best cross-chain bridges for crypto that have:
– Strong audits and bug bounty programs.
– Transparent validator/oracle designs.
– Significant volume and TVL.
– Let aggregators compare fees and routes for you, but still sanity-check what they pick.
– For experimental chains or assets:
– Assume higher risk.
– Only bridge what you’re willing to lose.
– Prefer bridges with clear, public backing from well-known projects or ecosystems.
Cross-chain bridges are powerful tools but also major systemic risk points. Treat them the way you’d treat crossing a shaky but necessary suspension bridge over a canyon:
– Inspect the cables (security model),
– Check the weight limit (TVL, audits, history),
– Start with a small step (test transfer),
– And only then drive your full load across.